

A working knowledge of PSP is assumed.
SUPPLIES NEEDED
Tube of choice. I am using the art of Alicia Mujica, which I purchased as a CDO exclusive.
NOTE: This tutorial is written for the image and supplies I used. If you are using something different, you may need to adjust some settings.
IPL = In Palette Layers
REMINDER: Be sure to delete the template layer after filling it.
LET's BEGIN
Install mask in your mask file.
Open supplies in psp.
Duplicate the template and delete the original. IPL, delete the credit and shadow layers.
Click on the white background. Go to Layers - Make a New Raster Layer. Flood fill with the black glitter paper.
Apply the bp_softSquare mask. Settings: Check source luminance. Check fit to canvas. Check Invert transparency. Check Hide all mask.
Layers - Merge - Merge Group. Reduce the size down to 95%.
Click on the H rectangle. Select All - Float - Defloat. New Raster Layer. From your foreground color palette, click the pattern tab and select the brick wall. Angle = 0. Scale = 100. Fill the new raster layer. Select None. Give brick wall a drop shadow. H & V = 0. Opacity = 100. Blur = 20.
Click on the V rectangle. Select All - Float - Defloat. New Raster Layer. From your foreground color palette, click the pattern tab and select the blue paper. Angle = 0. Scale = 100. Fill the new raster layer. Select None. Give a drop shadow. H & V = 0. Opacity = 100. Blur = 20. IPL, duplicate the blue layer. Right click the top blue layer and merge down with original.
Click on the lg circle. Select all - Float - Defloat. New Raster Layer. From foreground color palette, click the pattern tab and select the black glitter paper. Flood fill the large circle. Select none. IPL, right click and duplicate. Merge the duplicate down to original. Add same drop shadow as last used.
Repeat these steps for the small circle.
Click on the sm rectangle. Select all - Float - Defloat. New Raster Layer. In your foreground color palette, click on the pattern tab and select the heart paper. Set angle to 45. Make the scale at 60.
Fill the new Raster Layer. Selections - Modify - Expand - by 2. New Raster Layer. Fill with this color, e75892. Select None. IPL, move the pink layer below the heart paper layer. Give pink layer same drop shadow we've been using. IPL right click the pink layer, duplicate, merge duplicate down to original.
Click on the frame background. Select All - Float - Defloat. New Raster Layer. Fill with this color, e75892. Selections - Modify - Expand - by 2. New Raster Layer. Fill new layer with black. Select None. IPL, move the black layer below the pink. Give black layer the same drop shadow we've been using.
Click on the pink layer. Go to Effects - 3D - Inner Bevel. Settings: Bevel #5. Width = 10. Smoothness = 0. Depth = 25. Ambience = -5. Shininess = 0.
Click on the frame fill layer. Select All - Float - Defloat. New Raster Layer. In the foreground color palette click on the pattern tab. Locate the brick wall. Set Angle to 0. Put the scale at 150. Fill the frame fill layer. Keep layer active.
Paste, as a new layer, the largest tube. Center it in the frame as you like. Selections - Invert. Delete. Select none. Add same drop shadow.
Click on the frame layer. Select All - Float - Defloat. New Raster Layer. Fill this layer with the black glitter paper. Selections - Modify - Expand - by 2. New Raster Layer. Fill with the pink color, e75892. Select None. IPL, move the pink layer below the black glitter. Give pink layer the same drop shadow we've been using.
Click on the strip layer. Select All - Float - Defloat. New Raster Layer. Fill this layer with the black glitter paper. New Raster Layer. Selections - Modify - Expand - by 2. Fill with the pink color, 275892. Select None. IPL, move the pink layer below the black glitter. Click on the pink layer. Go to Effects - Textures - Blinds. Settings: Width = 6. Opacity = 100. Color is black. No check in horizontal. Give the same drop shadow.
IPL, right click a V staple and duplicate. For the duplicate change the blend mode to screen. Merge it down to original V staple. Give drop shadow. Do the same for the H staple.
Paste, as a new layer, the star charm. Place it so the link is over the H staple. Erase a small piece of the link so it looks like it's going through the staple. (see my tag). Add the drop shadow.
Paste, as a new layer, the word art. Place it to the left of the frame. (see my tag).
If you are not going to blink the eye, go ahead and add copyright, name and merge all.
To make the eye blink.
There may be a better way to do this, I'm just showing you how I did it. For those who have never done this before, I've added step by step images to hopefully help and not confuse you.
Add copyright and merge all layers.
Copy your tag and post it in animation shop as a new animation.
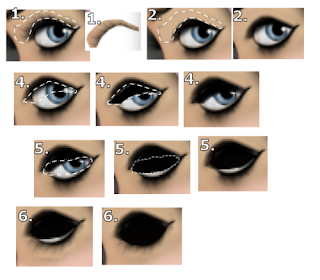
1. Using the lasso tool, encircle the eyelashes and a tiny bit of the top of the black eye lid area. Copy. Now paste it as a new image onto your psp canvas. Set it aside. We will use it later.
2. With the eyelash area still active, fill the area with a color matching the skin around the eye. I used d2b08d. Select None.
Using your soften brush, with size setting around 4, go over the edges and smooth out the area. You may need to do this a couple of times for the best effect.
3. Copy tag. In animation shop, right click the tag you put there earlier. Paste after current frame.
4. Encircle the bottom edge of the black lid and about a third of the upper part of the white of the eye. Fill this in with the same black used on the eye lid. Select None. Copy. In animation shop, click on the 2nd frame of the tag and paste after current frame.
5. Ok, this time encircle the remaining white of the eye, except for a very small slit. Fill this with the black. Select None. Copy. In animation shop, right click on the 3rd frame of the tag and paste after current frame.
6. Now, paste, as a new layer, the eyelashes you had set aside earlier. Flip and rotate about 38 degrees left. Place them along the bottom eyelashes. IPL, right click and merge the lashes to your image. Use your soften brush to smooth out the edges and blend the skin colors.
Copy. In animation, right click the last frame of your tag and pastes after current layer.
7. In animation shop, right click frame 4 and copy. Click on frame 5 and paste after current frame. Right click 3, copy. Click frame 6. Paste after current frame. Right click frame 2, copy. Right click frame 7 and paste after frame.
You should now have 8 frames total.
8. Go up to Edit. Select All. Go to Animation - Frame Properties. Set to 5.
Click on frame 1. Animation - Frame Properties. Set to 300.
Click frame 5. Animation - Frame Properties. Set to 50.
Go up to View - Animation. Are you happy with the results? If yes, Save as an mng file, for future use.
To add a name to your mng file tag. After making it in psp, paste as a new animation in animation shop. Go up to the tool bar and select Propagate paste. If you don't see it, try Edit - propagate paste.
Click on your name and type ctrl a ctrl c. Right click the first frame of your tag. Ctrl a ctrl e . Move name to where you want it.
Save as a gif file.
I hope you enjoyed this tutorial and found it easy to follow.
This tutorial was created January 19, 2019
All the ideas of this tutorial are copyrighted to BeckyP
Any resemblance to any other tutorial is purely a coincidence.
You are welcome to link to this tutorial and/or print it out for your own personal use.
Please do not copy this tutorial in order to place online.
Please do not re-write, pass out, or claim as your own. Thank you for your cooperation.
Click on the H rectangle. Select All - Float - Defloat. New Raster Layer. From your foreground color palette, click the pattern tab and select the brick wall. Angle = 0. Scale = 100. Fill the new raster layer. Select None. Give brick wall a drop shadow. H & V = 0. Opacity = 100. Blur = 20.
Click on the V rectangle. Select All - Float - Defloat. New Raster Layer. From your foreground color palette, click the pattern tab and select the blue paper. Angle = 0. Scale = 100. Fill the new raster layer. Select None. Give a drop shadow. H & V = 0. Opacity = 100. Blur = 20. IPL, duplicate the blue layer. Right click the top blue layer and merge down with original.
Click on the lg circle. Select all - Float - Defloat. New Raster Layer. From foreground color palette, click the pattern tab and select the black glitter paper. Flood fill the large circle. Select none. IPL, right click and duplicate. Merge the duplicate down to original. Add same drop shadow as last used.
Repeat these steps for the small circle.
Click on the sm rectangle. Select all - Float - Defloat. New Raster Layer. In your foreground color palette, click on the pattern tab and select the heart paper. Set angle to 45. Make the scale at 60.
Fill the new Raster Layer. Selections - Modify - Expand - by 2. New Raster Layer. Fill with this color, e75892. Select None. IPL, move the pink layer below the heart paper layer. Give pink layer same drop shadow we've been using. IPL right click the pink layer, duplicate, merge duplicate down to original.
Click on the frame background. Select All - Float - Defloat. New Raster Layer. Fill with this color, e75892. Selections - Modify - Expand - by 2. New Raster Layer. Fill new layer with black. Select None. IPL, move the black layer below the pink. Give black layer the same drop shadow we've been using.
Click on the pink layer. Go to Effects - 3D - Inner Bevel. Settings: Bevel #5. Width = 10. Smoothness = 0. Depth = 25. Ambience = -5. Shininess = 0.
Click on the frame fill layer. Select All - Float - Defloat. New Raster Layer. In the foreground color palette click on the pattern tab. Locate the brick wall. Set Angle to 0. Put the scale at 150. Fill the frame fill layer. Keep layer active.
Paste, as a new layer, the largest tube. Center it in the frame as you like. Selections - Invert. Delete. Select none. Add same drop shadow.
Click on the frame layer. Select All - Float - Defloat. New Raster Layer. Fill this layer with the black glitter paper. Selections - Modify - Expand - by 2. New Raster Layer. Fill with the pink color, e75892. Select None. IPL, move the pink layer below the black glitter. Give pink layer the same drop shadow we've been using.
Click on the strip layer. Select All - Float - Defloat. New Raster Layer. Fill this layer with the black glitter paper. New Raster Layer. Selections - Modify - Expand - by 2. Fill with the pink color, 275892. Select None. IPL, move the pink layer below the black glitter. Click on the pink layer. Go to Effects - Textures - Blinds. Settings: Width = 6. Opacity = 100. Color is black. No check in horizontal. Give the same drop shadow.
IPL, right click a V staple and duplicate. For the duplicate change the blend mode to screen. Merge it down to original V staple. Give drop shadow. Do the same for the H staple.
Paste, as a new layer, the star charm. Place it so the link is over the H staple. Erase a small piece of the link so it looks like it's going through the staple. (see my tag). Add the drop shadow.
Paste, as a new layer, the word art. Place it to the left of the frame. (see my tag).
If you are not going to blink the eye, go ahead and add copyright, name and merge all.
To make the eye blink.
There may be a better way to do this, I'm just showing you how I did it. For those who have never done this before, I've added step by step images to hopefully help and not confuse you.
Add copyright and merge all layers.
Copy your tag and post it in animation shop as a new animation.
1. Using the lasso tool, encircle the eyelashes and a tiny bit of the top of the black eye lid area. Copy. Now paste it as a new image onto your psp canvas. Set it aside. We will use it later.
2. With the eyelash area still active, fill the area with a color matching the skin around the eye. I used d2b08d. Select None.
Using your soften brush, with size setting around 4, go over the edges and smooth out the area. You may need to do this a couple of times for the best effect.
3. Copy tag. In animation shop, right click the tag you put there earlier. Paste after current frame.
4. Encircle the bottom edge of the black lid and about a third of the upper part of the white of the eye. Fill this in with the same black used on the eye lid. Select None. Copy. In animation shop, click on the 2nd frame of the tag and paste after current frame.
5. Ok, this time encircle the remaining white of the eye, except for a very small slit. Fill this with the black. Select None. Copy. In animation shop, right click on the 3rd frame of the tag and paste after current frame.
6. Now, paste, as a new layer, the eyelashes you had set aside earlier. Flip and rotate about 38 degrees left. Place them along the bottom eyelashes. IPL, right click and merge the lashes to your image. Use your soften brush to smooth out the edges and blend the skin colors.
Copy. In animation, right click the last frame of your tag and pastes after current layer.

7. In animation shop, right click frame 4 and copy. Click on frame 5 and paste after current frame. Right click 3, copy. Click frame 6. Paste after current frame. Right click frame 2, copy. Right click frame 7 and paste after frame.
You should now have 8 frames total.
8. Go up to Edit. Select All. Go to Animation - Frame Properties. Set to 5.
Click on frame 1. Animation - Frame Properties. Set to 300.
Click frame 5. Animation - Frame Properties. Set to 50.
Go up to View - Animation. Are you happy with the results? If yes, Save as an mng file, for future use.
To add a name to your mng file tag. After making it in psp, paste as a new animation in animation shop. Go up to the tool bar and select Propagate paste. If you don't see it, try Edit - propagate paste.
Click on your name and type ctrl a ctrl c. Right click the first frame of your tag. Ctrl a ctrl e . Move name to where you want it.
Save as a gif file.
I hope you enjoyed this tutorial and found it easy to follow.
This tutorial was created January 19, 2019
All the ideas of this tutorial are copyrighted to BeckyP
Any resemblance to any other tutorial is purely a coincidence.
You are welcome to link to this tutorial and/or print it out for your own personal use.
Please do not copy this tutorial in order to place online.
Please do not re-write, pass out, or claim as your own. Thank you for your cooperation.